Rabu, 29 September 2021

Enam Contoh Tabel NOtasi Pseudocode dari Algorirma

Berikut enam contoh tabel notasi pseudocode dari algoritme 

1. Contoh Pseudocode untuk menginput tiga buah bilangan

Disini kita akan membuat pseudocode dengan menginput 3 bilangan dan menentukan bilangan terbesar, terkecil, dan rata-ratanya. berikut bentuk algoritma dalam Pseudocode:

If (A>B ; A>C) then Print “A paling besar” If (B>A ; B>C) then Print “B paling besar” Else Print “C terkecil” End if

  • Jumlah = A + B + C
    rata-rata = Jumlah / 3
    Output rata-rata

2. Contoh Pseudocode untuk mengubah satuan waktu

Disini kita akan mengubah waktu (detik, menit, dan jam) dimana dari detik ke stuan jam, dan ke satuan menit. untuk membuat Algoritma Pseudocode kita bisa memasukkan detik, menit = 60 detik, jam = 3600 detik, tampilkan menit, dan tampilkan jam.

Penulisan Pseudocode sebagai berikut:

 Read detik M = 60 s H = 3600 s Output M Output H

3. Contoh Pseudocode untuk menentukan bilangan ganjil dan genap

Sebelum kita membuat tulisan pseudocode, hal yang harus dilakukan adalah menginput sebuah bilangan, bagi bilangan yang tadi dimasukkan dengan angka dua, jika bilangannya menghasilkan sisa pembagian nol maka itu adalah genap, sedangkan jika bilangan tidak menghasilkan sisa pembagian 0 maka itu adalan bilangan ganjil.

berikut penulisan Pseudocode dalam menentukan bilangan genap dan ganjil:

Read Bilangan If bil mod 2 = 0  then, “Output Genap” Else “Output Ganjil” End if

4. Contoh Pseudocode menghitung bilangan prima dan bukan

Kita tahu bahawa bilangan prima adalah bilangan yang habis dibagi satu dan bilangan yang angkanya lebih besar dari 28 tidak memiliki kelipatan.

Deklarasi Ulang,Jumb,Sisa,Bilangan : Interger Hasil : String Deskripsisi Read (Bilangan) For (ulang = 1 to ulang <=bil.step1) sisa if (sisa=0) THEN jumB  <-jumB+1 Else jumb2) THEN Hasil <-(“Bukan bil prima”) Else Hasil <-(“Bilangan Prima”) Write (Hasil)

5. Contoh Pseudocode dalam menghitung nilai

Ketika kita memiliki sebuah tabel dan merupaka sebuah daftar nilai untuk murid atau siswa, seperti:

Nilai

Huruf

Ket

86 – 100

A

Lulus

71 – 85

B

Lulus

61 – 70

C

Lulus

51 – 60

D

Tidak Lulus

0 – 50

E

Tidak Lulus

Input:
Nim
Nama
MataPelajaran
Nilai(0-100)

Output:
Nim
Nama
Matapelajaran
Nilaiangka(0-100)
NilaiHuruf(A-E)

Algoritma:
Nim : String
Nilai_angka : Interger
Nilai_huruf : real
Nama : String
Matapelajaran : String

Tulisan dalam Pseudocode:

Deskripsi: Read Nim Read Nama Read Nilai IF Nilaiangka>= 0 AND Nilai_Angka<=50 THEN NilaiHuruf <- ‘E’ ELSE IF NilaiAngka>=51 AND NilaiAngka <=60 THEN NilaiHuruf <- ‘D’ ELSE IF NilaiAngka>=61 AND NilaiAngka <=70 THEN NilaiHuruf <- ‘C’ ELSE IF NilaiAngka>=71 AND NilaiAngka <=60 THEN NilaiHuruf <- ‘B’ ELSE IF NilaiAngka>=86 AND NilaiAngka <=60 THEN NilaiHuruf <- ‘A’ END IF IF NilaiAngka>=61 AND NilaiAngka<=100 THEN Ket <- “LULUS” ELSE IF NilaiAngka>=0 AND NilaiAngka<=60 THEN Ket <- “TIDAK LULUS” END IF WRITE NIM

6. Contoh Pseudocode untuk menampilkan 4 menu

Empat menu ter diri dari: Persegi empat, Lingkaran, dan Balok, untuk penulisan pseudocode sebagai berikut:

Deskripsi WRITE (MENU) WRITE (1.PERSEGI EMPAT) WRITE (2.LINGKARAN) WRITE (3.BALOK) WRITE (4.KE


Senin, 12 Juli 2021

Tahapan Kompilasi yang Mejadi Standar Penerjemahan Kode.

 Teknik Kompilasi 

TAHAPAN KOMPILASI

disini akan dijelaskan secara singkat terhadapn tahapan yang menjadi standar dalam menerjemahkan kode dari bahasa pemograman menjadi bahasa mesin pada komputer.

Compiler adalah suatu program yang dapat membaca suatu Bahasa pemrograman (source language) dan kemudian diterjemahkan ke dalam Bahasa pemrograman lain (target language).


Phase Analysis :


Lexical Analyzer

Pada Compiler, lexical analyzer biasa disebut juga sebagai scanner. Lexical analyzer adalah tahapan pertama yang dilakukan pada compiler. Proses yang dilakukan pada tahapan ini adalah membaca program sumber karakter per karakter. Satu atau lebih (deretan) karakter karakter ini dikelompokkan menjadi suatu kesatuan mengikuti pola kesatuan kelompok karakter (token) yang ditentukan dalam bahasa sumber dan disimpan dalam table simbol, sedangkan karakter yang tidak mengikuti pola akan dilaporkan sebagai token tak dikenal.

Syntax Analyzer

Setelah tahapan lexical analyzer selesai berikutnya adalah tahapan syntax analyzer atau biasa juga disebut Parser. Pada tahapan ini token yang didapatkan dari hasil lexical analysis  diurutkan atau disusun lalu dikelompokkan ke dalam suatu struktur tertentu secara spesifik.

Semantic Analyzer

Setelah tahapan syntax analyzer selesai berikutnya adalah tahapan semantic analyzer. Tahapan semantic analyzer merupakan tahapan yang penting karena merupakan pusar dari tahapan kompilasi, dan juga merupakan jembatan antara fase analysis dan fase synthesis pada compiler. Pada tahapan ini program sumber akan diperiksa untuk mencari kemungkinan kesalahan semantic dengan cara memanfaatkan struktur hirarkikal yang dihasil dari tahapan syntax analyzer. Pada tahapan ini akan dihasilkan suatu kode yang executable pada kompilasi yang sederhana lalu dimanipulasi dengan berbagai optimization dari translator sampai nanti benar-benar executable dihasilkan.

Phase Synthesis :


Intermediate Code Generator

Intermediate code generator merupakan tahapan awal dari phase synthesis. Proses yang dilakukan pada tahapan ini me-generate atau membangkitkan suatu code berdasarkan parsing tree, lalu selanjutnya diterjemahkan ke dalam bentuk three address code, quadruples atau triples.

Code Optimizer

Setelah melakukan tahapan intermediate code generator berikutnya yang dilakukan adalah tahapan code optimizer. Adapun yang dilakukan pada tahapan ini adalah mengoptimisasi code sehingga menjadi code yang executable. Tahapan ini dilakukan untuk mempercepat waktu eksekusi dari suatu program dengan cara menghilangkan redudansi pada code.

Code Generator

Tahapan code generator ini merupakan tahapan terakhir pada proses kompilasi. Pada tahapan ini akan dilakukan penentuan register untuk masing-masing variable lalu instruksi-instruksi dalam bentuk antara akan diterjemahkan ke dalam Bahasa mesin, dan akhirnya akan menghasilkan relocatable machine code atau assembly code.

Symbol Table Manager

Symbol Table adalah sebuah struktur data dengan record-record untuk setiap identifier dengan field-field untuk setiap atribut dari identifier tersebut.

Error Handler

Error handler merupakan bagian dari compiler untuk menangani dan melaporkan jika ditemukan suatu error.

Jumat, 19 Juni 2020

Programming KDE Using Qt

Programming KDE Using Qt
    In Chapter 16, you looked at the GNOME/GTK+ GUI libraries for creating graphical user interfaces under X. These libraries are only half of the story; the other big player on the GUI scene in Linux is KDE/Qt, and in this chapter you look at these libraries and see how they shape up against the competition.
    Qt is written in C++, the standard language in which to write Qt/KDE applications, so in this chapter you’ll be obliged to take a diversion from the usual C and get your hands dirty with C++. You might like to take this opportunity to refresh your memory on C++, especially reminding yourself of the principles of derivation, encapsulation, method overloading, and virtual functions.
In this chapter, we cover
  • An introduction to Qt
  • Installing Qt
  • Getting started
  • Signal/slot mechanism
  • Qt widgets
  • Dialogs
  • Menus and toolbars with KDE
  • Building your CD database application with KDE/Qt
Introducing KDE and Qt
    KDE (K Desktop Environment) is an open source desktop environment based on the Qt GUI library. A host of applications and utilities are part of KDE, including a complete office suite, a Web browser, and even a fully featured IDE for programming KDE/Qt applications (KDevelop, covered in Chapter 9). Industry recognition of how advanced KDE’s applications are came when Apple chose to use KDE’s Web browser as the core of the primary Web browser for Mac OS X, called Safari, known as a very fast browser.

Why use Qt Creator

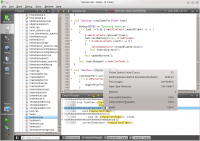
KDE4's ktimetracker loaded as QtCreator project
To create your C++ applications you can use any text editor. But life will be much easier if you gain QtCreator's features. That means
  • you can get your source code saved, built and run with one click
  • you get code-completion
  • you can find all places in your source code where you call a function (e.g. "where do I call refresh()")
  • you can go back to a more recent cursor position with your editor, even if this is in another file
  • you can checkout and commit to Subversion or Git repositories without leaving your workflow

Creating a new program

Here is a short example of how you can create a "hello world" application. For more information read the user documentation.
Step 0
Call QtCreator
qtcreator
Then select New File or Project -> Qt C++ Project -> Qt Gui Application -> name = helloworld -> Next -> Next -> Finish
Step 1
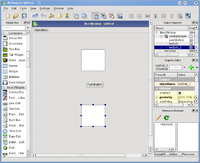
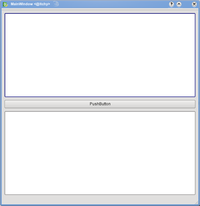
Select Edit -> Forms -> mainwindow.ui. Add the widgets you want by drag-and-drop:
Designer-step1.png
Step 2
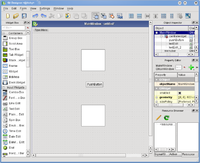
Select the mainwindow. This is the one un-intuitive step. To lay out the objects in the mainwindow, you do not select the objects in the mainwindow, but the mainwindow itself.
Designer-step2.png
Step 3
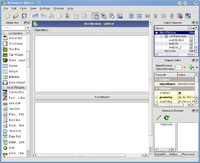
Select Form -> Lay Out in a Grid
Designer-step3.png
Result
You get a decent look, and if you resize the window, the widgets resize as well.
Designer-result.png

Using KDE libraries

To use KDE classes like KMessageBox, you need to tell QtCreator to use the KDE libraries when building. Go to your home directory, change into yourproject and modify yourproject.pro. Add the line
LIBS += -lkdeui
Then you can start using KDE classes in your code.

Adding a toolbar

To add a toolbar, right-click on the UI and choose "Add Toolbar". Then you can set icons and text in your mainwindow's constructor with code like this:
ui->toolBar->addAction(QIcon("/usr/share/icons/oxygen/22x22/apps/ktip.png"),"hello world");

Load an existing project

This describes how to use QtCreator to integrate existing KDE 4 applications. It has been tested with QtCreator 1.2.80 and SUSE Linux 11.1 but should work same or similar with every combination. As an example KDE application we use ktimetracker from the kdepim module, other applications should work likewise.
You can either work with code on your disk or have QtCreator do the repository checkout.

Use code from your disk

  • import the CMakeLists.txt file (File -> Open -> kdepim/CMakeLists.txt)
  • as build directory choose kdepim
  • you will automatically come to a screen where you can run CMake
  • continue with the step "Run cmake"

Have QtCreator do the git checkout

  • choose File -> New File or Project -> Import Project -> Git Repository Clone.
  • enter a Git URL like git@git.kde.org:/kdepim
  • accept kdepim as checkout directory
  • type finish, see how the checkout starts
Note
If the checkout fails with the message "remote host hung up unexpectedly" do a checkout from konsole. You may have to accept git.kde.org's fingerprint.
  • you will automatically come to a screen where you can run CMake
  • continue with the step "Run cmake"

Have QtCreator do the subversion checkout

  • choose File -> New File or Project -> Import Project -> Subversion Checkout.
  • enter a Subversion URL like svn://anonsvn.kde.org/home/kde/trunk/KDE/kdepim
  • enter a checkout directory, i.e. the local directory where the code will be checked-out to
  • type finish, see how the checkout starts
  • you will automatically come to a screen where you can run CMake
  • continue with the step "Run cmake"

Run cmake

  • enter arguments for CMake like
/path/to/kdepim -DCMAKE_INSTALL_PREFIX=/usr/local -DLIB_SUFFIX=64 -DCMAKE_BUILD_TYPE=debugfull
DLIB_SUFFIX=64 means that you want to install your libraries into directories named lib64, not lib/path/to/kdepim is where your source code is.
  • click "Run cmake"
  • note: a .cbp file is created containing many information about the build
  • click "Finish"

Build it

  • configure QtCreator to build only ktimetracker:
Projects -> Active run configuration=ktimetracker -> build settings -> build steps -> make -> show details -> activate ktimetracker.
  • configure QtCreator to use 8 logical processors:
Projects -> Active run configuration=ktimetracker -> build settings -> build steps -> make -> show details -> addtional Arguments = -j8
  • choose Build -> Build All

Programming GNOME Using GTK+

Getting Started with GTK+

   GTK+ is a widget toolkit. Each user interface created by GTK+ consists of widgets. This is implemented in C using GObject, an object-oriented framework for C. Widgets are organized in a hierachy. The window widget is the main container. The user interface is then built by adding buttons, drop-down menus, input fields, and other widgets to the window. If you are creating complex user interfaces it is recommended to use GtkBuilder and its GTK-specific markup description language, instead of assembling the interface manually. You can also use a visual user interface editor, like Glade.
   GTK+ is event-driven. The toolkit listens for events such as a click on a button, and passes the event to your application.
This chapter contains some tutorial information to get you started with GTK+ programming. It assumes that you have GTK+, its dependencies and a C compiler installed and ready to use. If you need to build GTK+ itself first, refer to the Compiling the GTK+ libraries section in this reference.

Basics

   To begin our introduction to GTK, we'll start with a simple signal-based Gtk application. This program will create an empty 200 × 200 pixel window.
Create a new file with the following content named example-0.c.
#include <gtk/gtk.h>

static void
activate (GtkApplication* app,
          gpointer        user_data)
{
  GtkWidget *window;

  window = gtk_application_window_new (app);
  gtk_window_set_title (GTK_WINDOW (window), "Window");
  gtk_window_set_default_size (GTK_WINDOW (window), 200, 200);
  gtk_widget_show_all (window);
}

int
main (int    argc,
      char **argv)
{
  GtkApplication *app;
  int status;

  app = gtk_application_new ("org.gtk.example", G_APPLICATION_FLAGS_NONE);
  g_signal_connect (app, "activate", G_CALLBACK (activate), NULL);
  status = g_application_run (G_APPLICATION (app), argc, argv);
  g_object_unref (app);

  return status;
}
You can compile the program above with GCC using:

        gcc `pkg-config --cflags gtk+-3.0` -o example-0 example-0.c `pkg-config --libs gtk+-3.0`
      
For more information on how to compile a GTK+ application, please refer to the Compiling GTK+ Applications section in this reference.
All GTK+ applications will, of course, include gtk/gtk.h, which declares functions, types and macros required by GTK+ applications.
Even if GTK+ installs multiple header files, only the top-level gtk/gtk.h header can be directly included by third party code. The compiler will abort with an error if any other header is directly included.
In a GTK+ application, the purpose of the main() function is to create a GtkApplication object and run it. In this example a GtkApplication pointer named app is called and then initialized using gtk_application_new().
When creating a GtkApplication you need to pick an application identifier (a name) and input to gtk_application_new() as parameter. For this example org.gtk.example is used but for choosing an identifier for your application see this guide. Lastly gtk_application_new() takes a GApplicationFlags as input for your application, if your application would have special needs.
Next the activate signal is connected to the activate() function above the main() functions. The activate signal will be sent when your application is launched with g_application_run() on the line below. The gtk_application_run() also takes as arguments the pointers to the command line arguments counter and string array; this allows GTK+ to parse specific command line arguments that control the behavior of GTK+ itself. The parsed arguments will be removed from the array, leaving the unrecognized ones for your application to parse.
Within g_application_run the activate() signal is sent and we then proceed into the activate() function of the application. Inside the activate() function we want to construct our GTK window, so that a window is shown when the application is launched. The call to gtk_application_window_new() will create a new GtkWindow and store it inside the window pointer. The window will have a frame, a title bar, and window controls depending on the platform.
A window title is set using gtk_window_set_title(). This function takes a GtkWindow* pointer and a string as input. As our window pointer is a GtkWidget pointer, we need to cast it to GtkWindow*. But instead of casting window via (GtkWindow*)window can be cast using the macro GTK_WINDOW()GTK_WINDOW() will check if the pointer is an instance of the GtkWindow class, before casting, and emit a warning if the check fails. More information about this convention can be found here.
Finally the window size is set using gtk_window_set_default_size and the window is then shown by GTK via gtk_widget_show_all().
When you exit the window, by for example pressing the X, the g_application_run() in the main loop returns with a number which is saved inside an integer named "status". Afterwards, the GtkApplication object is freed from memory with g_object_unref(). Finally the status integer is returned and the GTK application exits.
While the program is running, GTK+ is receiving events. These are typically input events caused by the user interacting with your program, but also things like messages from the window manager or other applications. GTK+ processes these and as a result, signals may be emitted on your widgets. Connecting handlers for these signals is how you normally make your program do something in response to user input.
The following example is slightly more complex, and tries to showcase some of the capabilities of GTK+.
In the long tradition of programming languages and libraries, it is called Hello, World.

Example 1. Hello World in GTK+
Create a new file with the following content named example-1.c.
#include <gtk/gtk.h>

static void
print_hello (GtkWidget *widget,
             gpointer   data)
{
  g_print ("Hello World\n");
}

static void
activate (GtkApplication *app,
          gpointer        user_data)
{
  GtkWidget *window;
  GtkWidget *button;
  GtkWidget *button_box;

  window = gtk_application_window_new (app);
  gtk_window_set_title (GTK_WINDOW (window), "Window");
  gtk_window_set_default_size (GTK_WINDOW (window), 200, 200);

  button_box = gtk_button_box_new (GTK_ORIENTATION_HORIZONTAL);
  gtk_container_add (GTK_CONTAINER (window), button_box);

  button = gtk_button_new_with_label ("Hello World");
  g_signal_connect (button, "clicked", G_CALLBACK (print_hello), NULL);
  g_signal_connect_swapped (button, "clicked", G_CALLBACK (gtk_widget_destroy), window);
  gtk_container_add (GTK_CONTAINER (button_box), button);

  gtk_widget_show_all (window);
}

int
main (int    argc,
      char **argv)
{
  GtkApplication *app;
  int status;

  app = gtk_application_new ("org.gtk.example", G_APPLICATION_FLAGS_NONE);
  g_signal_connect (app, "activate", G_CALLBACK (activate), NULL);
  status = g_application_run (G_APPLICATION (app), argc, argv);
  g_object_unref (app);

  return status;
}

You can compile the program above with GCC using:

        gcc `pkg-config --cflags gtk+-3.0` -o example-1 example-1.c `pkg-config --libs gtk+-3.0`
      
As seen above, example-1.c builds further upon example-0.c by adding a button to our window, with the label "Hello World". Two new GtkWidget pointers are declared to accomplish this, button and button_box. The button_box variable is created to store a GtkButtonBox which is GTK+'s way of controlling the size and layout of buttons. The GtkButtonBox is created and assigned to gtk_button_box_new() which takes a GtkOrientation enum as parameter. The buttons which this box will contain can either be stored horizontally or vertically but this does not matter in this particular case as we are dealing with only one button. After initializing button_box with horizontal orientation, the code adds the button_box widget to the window widget using gtk_container_add().
Next the button variable is initialized in similar manner. gtk_button_new_with_label() is called which returns a GtkButton to be stored inside button. Afterwards button is added to our button_box. Using g_signal_connect the button is connected to a function in our app called print_hello(), so that when the button is clicked, GTK will call this function. As the print_hello() function does not use any data as input, NULL is passed to it. print_hello() calls g_print() with the string "Hello World" which will print Hello World in a terminal if the GTK application was started from one.
After connecting print_hello(), another signal is connected to the "clicked" state of the button using g_signal_connect_swapped(). This functions is similar to a g_signal_connect() with the difference lying in how the callback function is treated. g_signal_connect_swapped() allow you to specify what the callback function should take as parameter by letting you pass it as data. In this case the function being called back is gtk_widget_destroy() and the window pointer is passed to it. This has the effect that when the button is clicked, the whole GTK window is destroyed. In contrast if a normal g_signal_connect() were used to connect the "clicked" signal with gtk_widget_destroy(), then the button itself would have been destroyed, not the window. More information about creating buttons can be found here.
The rest of the code in example-1.c is identical to example-0.c. Next section will elaborate further on how to add several GtkWidgets to your GTK application.

Enam Contoh Tabel NOtasi Pseudocode dari Algorirma

Berikut enam contoh tabel notasi pseudocode dari algoritme  1. Contoh Pseudocode untuk menginput tiga buah bilangan Disini kita akan membu...